|
Defining Investigation Details
The first step in the investigation process is to define the initial parameters of the investigation, including the selection of the sites to be investigated. The left side of the application displays the Investigation panel which contains two tabs: Investigation Details Tab and Site Selection tab. The subsections below provide an overview of each tab. When the user is done completing both tabs, click the NEXT > button in the lower right corner to advance to the next step.
Investigation Details Tab
The Investigation Details tab is the first tab to be completed. The form is displayed below which allows the user to enter the initial parameters (details) that will define the investigation.
.jpg)
The first step is to enter the details which include the following (required fields are noted):
•Investigation Name (*required) - Enter the name for this investigation
•Investigation Type (*required) - This requires the user to select the type of investigation being conducted (e.g., HSIP, SAFETAP, Ad-Hoc Crash Analysis, Traffic Operations Study)
•Investigation Reasons (*required) - This requires the user to select one or more reasons for conducting the investigation (e.g., Priority Network Segments, Safety Deficient Segment, Priority Intersections, Bicycle Specialty (HAL), etc.)
•Time Period (*required) - Select the From and To Dates for the investigation. This will define the crash data that to be included in this investigation. The user can either select both the From and To dates, or optionally, select the "To Date" then enter the number of years and set the toggle switch on which will automatically set the from date to the exact date X years earlier.
•Agency Type - This allows the user to specify the agency conducting the investigation (DOT Region, MPO, County, Local)
•Agency - Once agency type is selected, the specific agency can be selected/entered. For Regions, MPOs and Counties, a picklist can be used to select the desired agency name. For Local agencies, a text box is presented allowing the user to enter the agency name.
•Approval Date - This is not applicable when an investigation is first created. This is automatically set to the date when the investigation is approved.
•Crash Severity (*required) - This allows the user to select one or more crash severities that the investigation should be focused on. The default is for all severities to be selected
•Crash Focus (*required) - The crash focus defines the universe of crashes to be investigated. The default is ALL crashes, however the user can click the button to focus the investigation on only those crashes that occurred at an intersection or only crashes that occurred along a mainline.
•Description - Text box allowing the user to enter a more detailed description of the investigation being conducted
Site Selection Tab
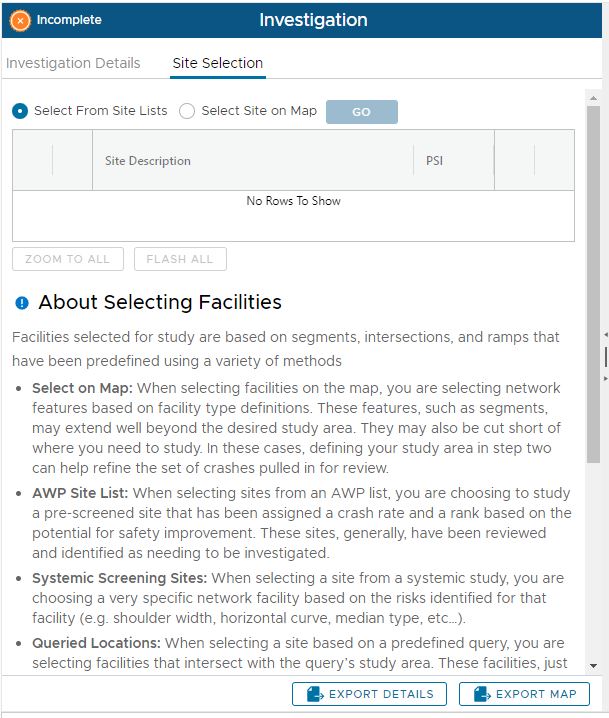
Once the investigation details are entered, the user should click the Site Selection tab, which allows the user to select the sites on which the investigation should be conducted. The image below shows the Site Selection tab.

There are two methods for selecting sites for the investigation: Selecting from a site list or selecting a site on the map. The radio button at the top of the tab allows the user to choose between these two methods. Each method is described in the sections below.
Selecting from Site Lists
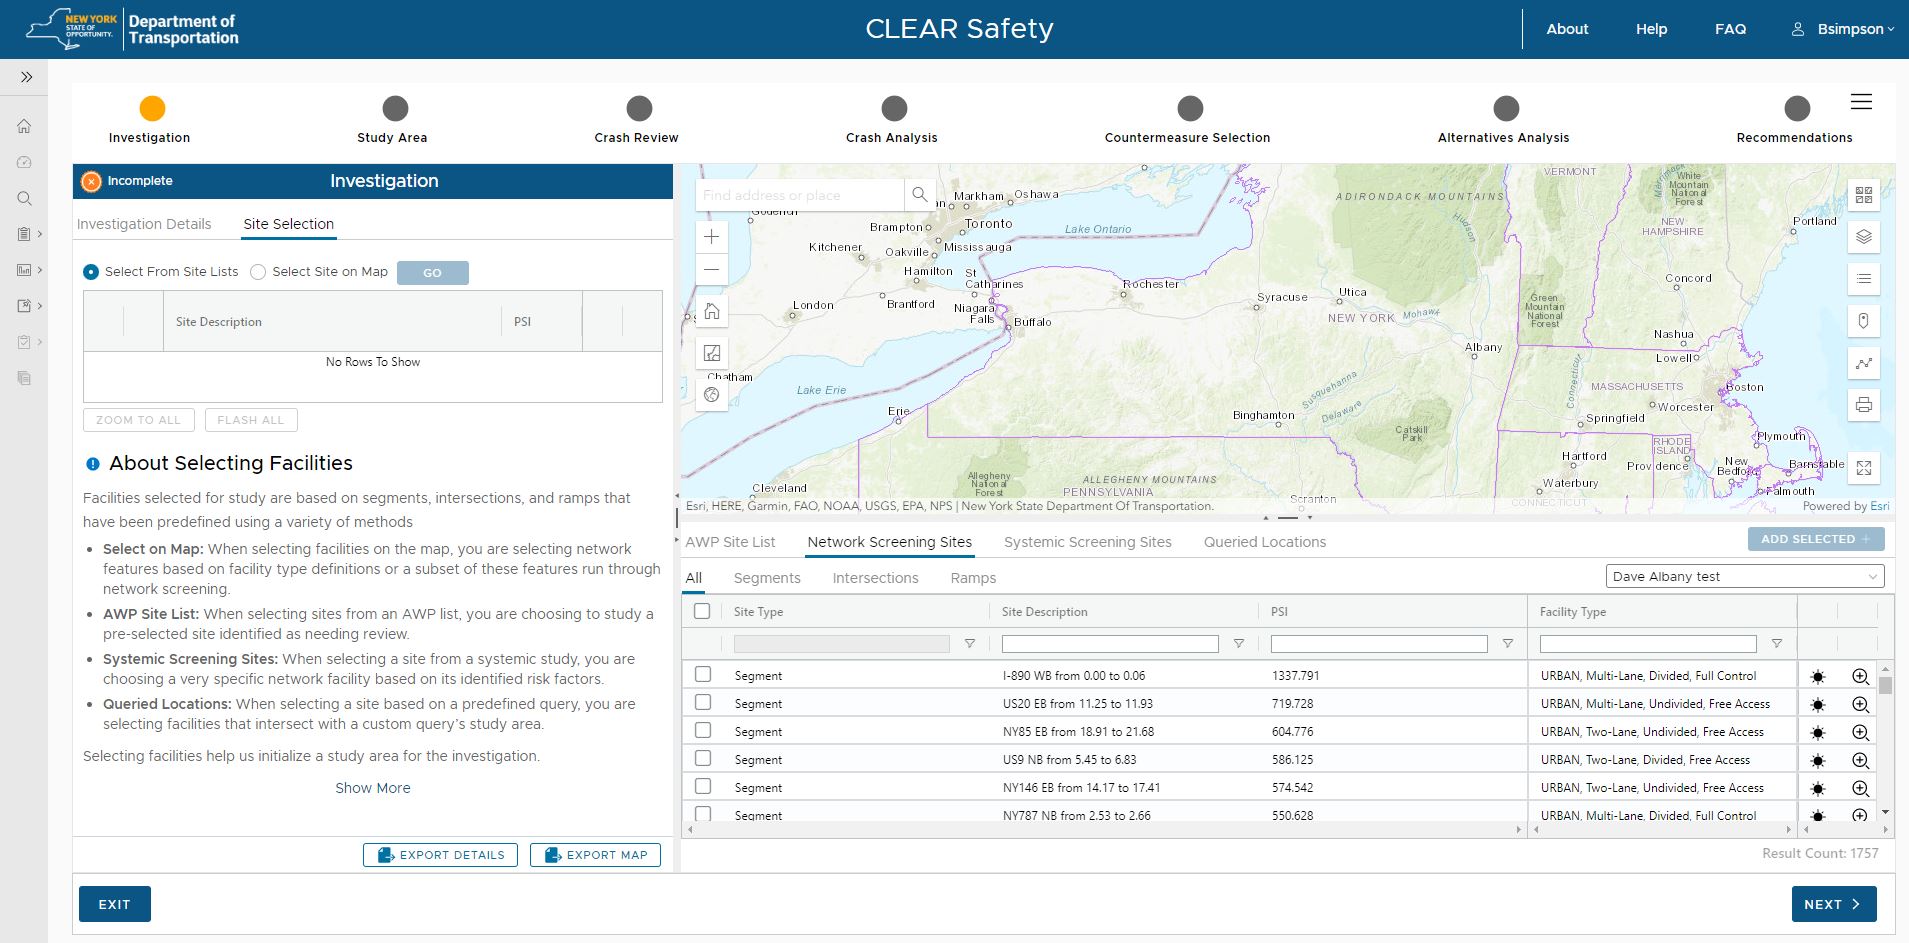
There are four lists that are presented in grid format in the lower right corner of the application (under the map display) from which the user can select sites to be investigated. A screenshot is displayed below.

Each list is presented as a tab. Selecting from these lists are described below.
Annual Work Plan (AWP) Site List
This allows the user to select sites from an Annual Work Plan (AWP) site list that has been created. From this tab, the following process can be followed to add an investigation site from the AWP List:
1.Click the "AWP Site List" tab (if not already selected) and from the first "Select Type" picklist above the grid, the user first selects the type of organization (DOT Region, MPO, County, Local Program Manager)
2.Next, select the specific region/organization from the second picklist (e.g., Region 1 if DOT, CDTC if MPO, etc.).
3.Next, the user selects the specific AWP Year from the right most picklist. The sites within the specified AWP List are then displayed within the grid. Sub tabs allow the user to focus specifically on a given site type if needed (Segments, Intersections, Ramps). The default subtab is "All" which shows all sites within the AWP list.
4.To add one or more sites to the investigation, check the box for each site to be added, and click the ADD SELECTED button above the grid. The selected sites are then added to the Site list grid at the top of the Investigation panel on the left
Network Screening Sites
This allows the user to select sites from the results of a Network Screening scenario. The following process can be followed to add an investigation site from a Network Screening scenario.
1.Click the "Network Screening Sites" tab, and from the "scenario" picklist above the grid, select the name of the screening scenario from which sites should be selected. The sites from the specified Network Screening scenario are then displayed within the grid.
2.To add one or more sites to the investigation, check the box for each site to be added, and click the ADD SELECTED button above the grid. The selected sites are then added to the Site list grid at the top of the Investigation panel on the left
Systemic Screening Sites
This allows the user to select sites from the results of a Systemic Screening study. The following process can be followed to add an investigation site from the results of a systemic screening:
1.Click the "Systemic Screening Sites" tab, and from the "Systemic Study" picklist above the grid, select the name of the systemic study from which sites should be selected. The sites from the specified Systemic screening study are then displayed within the grid.
2.To add one or more sites to the investigation, check the box for each site to be added, and click the ADD SELECTED button above the grid. The selected sites are then added to the Site list grid at the top of the Investigation panel on the left
Queried Locations
This allows the user to select sites that fall within the geographic extent of the Areas of Interest from a specified saved Query (created in Crash Data Viewer). The following process can be followed to add an investigation site from a queried location:
1.Click the "Queried Locations" tab, and from the "Select a Query" picklist above the grid, select the name of the saved query from which sites should be selected. The sites that fall within the areas of interest from the specified query are then displayed within the grid.
2.To add one or more sites to the investigation, check the box for each site to be added, and click the ADD SELECTED button above the grid. The selected sites are then added to the Site list grid at the top of the Investigation panel on the left
Selecting from the Map
The user can also add sites to the investigation by selecting them individually, directly from the map display. To add sites from the map:
1.Zoom the map display to the clearly show the site of interest
2.Click the "Select Site on Map" radio button at the top of the Investigation panel, and click the GO button. The Select Site type dialog is displayed as shown below
3.Click the radio button for the type to be selected, and click the SELECT button. The mouse cursor is then enabled to click for selection (and the GO button in the left panel changes to STOP if the user wants to terminate the selection process. The specific site type will drive the exact process as noted in the bullets below:
•Intersections - When intersection is selected as the site type, the individual "Areas of Influence" will be displayed for each intersection (when the map is zoomed in close enough). Click anywhere within the intersection area of influence, and it will be selected and added to the site list grid at the top of the investigation panel on the left.
•Segments - When segment is selected as the site type, the user should click on the desired segment (road centerline). The segment is then highlighted on the map and is added to the site list grid at the top of the investigation panel on the left.
•Ramps- When ramp is selected as the site type, the user should click on the desired ramp (road centerline). The ramp is then highlighted on the map and is added to the site list grid at the top of the investigation panel on the left.
Managing the Site List Grid
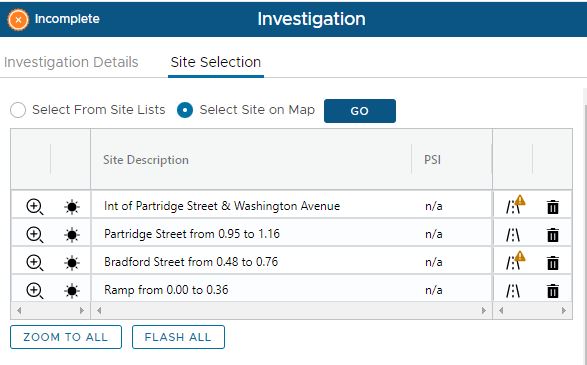
When sites are added to the investigation, each site is listed in a grid that appears at the top of the Investigation panel on the left side. The image below provides a screenshot of the site list grid. Each site is presented as a row with a description and the potential for safety improvement (PSI) score (when available).

Additionally the grid contains several tools for visualizing and managing the site list a
Zooming to a Site
Clicking the Zoom button (magnifier icon) on the left side of the grid zooms the map display to the location of the site
Flashing a Site
Clicking the Flash button (black star icon) on the left side of the grid flashes the site on the map display
Viewing and Modifying Traffic Volume
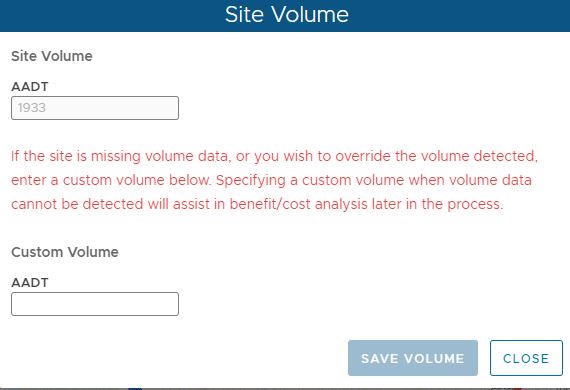
A traffic volume tool (road centerline icon) is available for each site in the grid. Sites that have an associated traffic volume in the database are shown with the basic icon, however, some sites do not have associated traffic volumes associated, and will appear with an amber triangle next to the icon. Clicking the Volume icon will display the "Site Volume" dialog as shown below.

For sites that have an associated volume, the AADT is displayed at the top of the dialog. If the user would like to "override" the volume and conduct the investigation with a custom volume, the user can enter the custom AADT in the bottom input box and click the SAVE VOLUME button. For sites that do NOT have an associated volume, entering a custom volume is highly recommended so that the investigation can be conducted in a proper manner. Click the CLOSE button to close the dialog when done viewing/modifying the Site Volume.
Deleting a Site from the Investigation
Clicking the Delete button (trash can icon) on the right side of the grid deletes/removes the site from the investigation site list
Zooming to all Sites
Clicking the ZOOM TO ALL button located BELOW the site grid zooms the map display to the location of ALL sites in the grid
Flashing all Sites
Clicking the FLASH ALL button located BELOW the site grid flashes ALL sites in the grid on the map display
Exporting the Investigation Details
Clicking the EXPORT DETAILS button at the bottom of the Investigation panel will export the details of the investigations to a PDF file
Exporting the Map
Clicking the EXPORT MAP button at the bottom of the Investigation panel will export the map display to a PDF file
|