|
Countermeasure Selection
Once the crash analysis has been completed, the user can then proceed to selecting countermeasures that represent potential opportunities to address or mitigate the existing or expected future safety issues based on the diagnosis of crash patterns and crash contributing factors. The result of this step is a list of options, not the final recommendation. Subsequent steps will compare alternatives and recommend the course of action (if any).
Analysts can select countermeasures based on professional judgment or use the countermeasure selection features in CLEAR Safety to help narrow the list of options. Specifically, CLEAR Safety provides filters to show recommended countermeasures based on the crash patterns and contributing factors identified in prior steps. Further, CLEAR Safety provides a filter to only show countermeasures that may be applicable the facility types included in the analysis. Finally, there is an option to add comments about the countermeasure. The comments field is a good place to document reasons for selecting a specific countermeasure, particularly if there are multiple applicable options.
To add a countermeasure, click the ADD COUNTERMEASURE button. The Countermeasure Details panel is displayed on the left as shown below.
.png)
The Countermeasure details page has four tabs to be completed in order to add a countermeasure to the investigation. The four tabs include:
•Select Countermeasure - User selects the desired countermeasure from a list
•Location - Specify the location and extent of the countermeasure implementation
•Review Costs - Specify the costs associated with implementing this countermeasure
•Review CMF - Specify the Crash Modification Factor (CMF) that should be applied
Instructions for completing each tab are described in the sections below.
Selecting the Countermeasure
The Select Countermeasure tab allows the user to select the desired countermeasure. The user must first pick a Category from the first pick list, then select the specific countermeasure. The Countermeasure Details panel is shown in the image below.
By default, the Category and Countermeasure pick lists show only the recommended countermeasures based on the contributing factors and crash patterns selected during the crash analysis step. It should be noted that if the user did not select any contributing factors or crash patterns, then the "View All" radio button must be applied. To view all available countermeasures, click the "View All" radio button. Similarly, to view only user-defined countermeasures (created elsewhere), click the "View User-Defined Only" radio button.
The Category pick list displays Contributing Factors by default. This can be changed to display Crash Pattern categories instead by clicking the "Crash Pattern" radio button for the "Filter by" setting.
Finally, the user can optionally choose filter to only show countermeasures that may be applicable the facility types included in the analysis. To apply this filter, check the corresponding box directly above the Category pick list.
The user should then click the Category pick list and select the category (either Crash Pattern or Contributing Factor). Once the category is selected, the Countermeasure pick list is populated with the available countermeasures based on the settings and category. Select the desired countermeasure, and optionally enter comments in the text box if desired. Then, click the NEXT button at the bottom of the panel to advance to the Location tab.
Location
The next step in countermeasure selection is to define the proposed treatment location. A countermeasure may apply to the entire site or a portion of the site. For intersections, the treatment will generally apply to the entire site for the purpose of subsequent computations, but the analyst can add notes to explain if the treatment should only apply to one or more approaches. For segments and ramps, the treatment may apply to the entire site or a portion of the site based on selected begin and end points. For instance, a roundabout would apply to an entire intersection, while rumble strips may only apply to a portion of a segment. The analyst can select a single location or multiple locations for the countermeasure during this step.
The Location tab displays a grid listing the studied sites in the investigation, as well as a three grids that will list the sites (or partial sites) to which the countermeasure should be applied, as shown in the image below.
.png)
To add a site to which the countermeasure should be applied, click Add Site (+) button for the desired site row within the studied sites grid. For intersections, the full intersection will be added as a location. However, for segments and ramps, this will display the "Identify Countermeasure Segment" dialog as shown below which allows the user to define whether to use the full or partial segment.
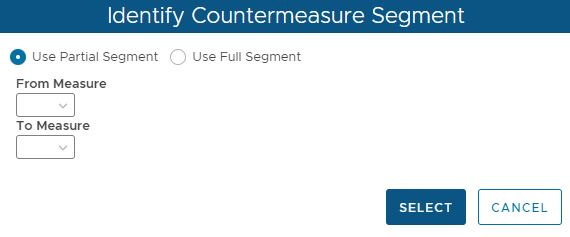
Click the radio button to select whether the countermeasure should be applied to the full segment or partial area of the segment (partial is default). When Partial segment is selected, the user must also select the From and To Measures to specify the portion of the segment to which the countermeasure will be applied. Use the pick lists to define the specific portion of the segment. When done, click the SELECT button. The site is then added to appropriate grid indicating it is a location for the countermeasure.
* Note, if the site that is added shows a yellow alert symbol on the roadway icon, this indicates that the traffic volume is unknown (similar to the adding sites to the investigation in Step 1). If there is no traffic volume for the site, it is recommended the user click the icon and enter a value to be used so that subsequent analysis can be computer properly.
Click the NEXT button at the bottom of the panel to advance to the Review Costs tab.
Reviewing Costs
The next step is to specify the costs of the countermeasure. Countermeasure costs include both the initial construction cost and ongoing operations and maintenance costs. The image below shows the Review Costs tab.
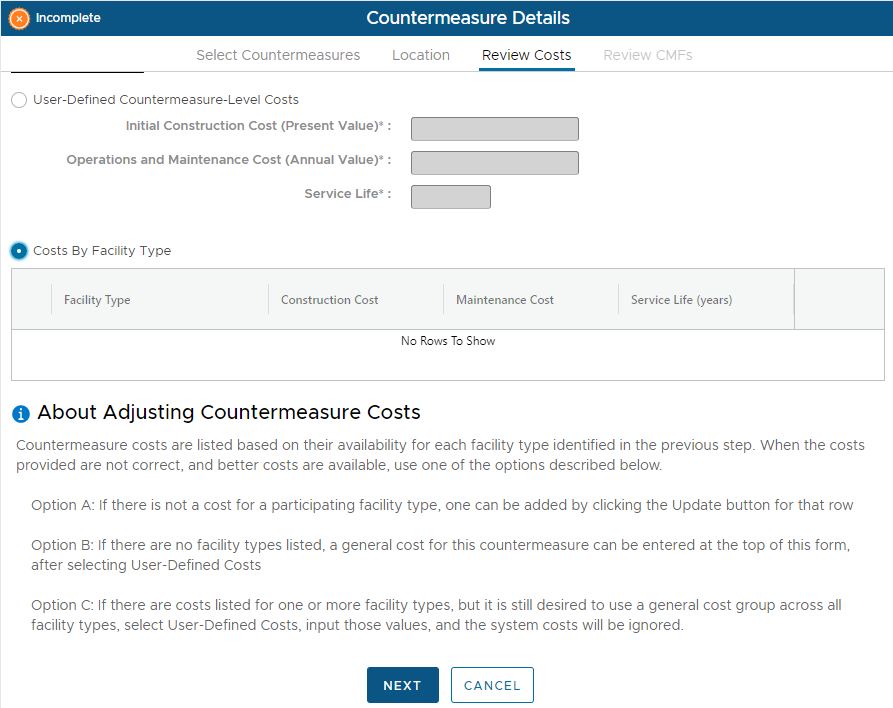
Many countermeasures will have a default cost associated with the facility type of the site to which the countermeasure is being applied. If this is the case, the costs will be displayed in the "Costs by Facility Type" grid. The user can select a specific cost by facility type if available. However, if no cost by facility type is available (or if the user simply wants to override the cost), they can click the "User-Defined Countermeasure Costs" radio button and enter the Initial Construction Cost, Operations and Maintenance Cost and Service Life. Initial construction costs include planning, design, construction/installation, and equipment costs. The user should be sure to enter initial construction costs as a present dollar value. Operations and maintenance costs include any utility costs (e.g., power or communications) and routine maintenance costs. Operations and maintenance costs should be entered as an average annual dollar value. Service life represents the time period for which a countermeasure may have a measurable impact on safety. For guidance on entering user defined costs, please refer to the Yellow Book. When done entering the costs, click NEXT to proceed to the "Review CMF" tab.
Reviewing CMFs
The next step is to specify the crash modification factors (CMF) to be used in subsequent calculations. The Review CMFs tab is shown in the image below.
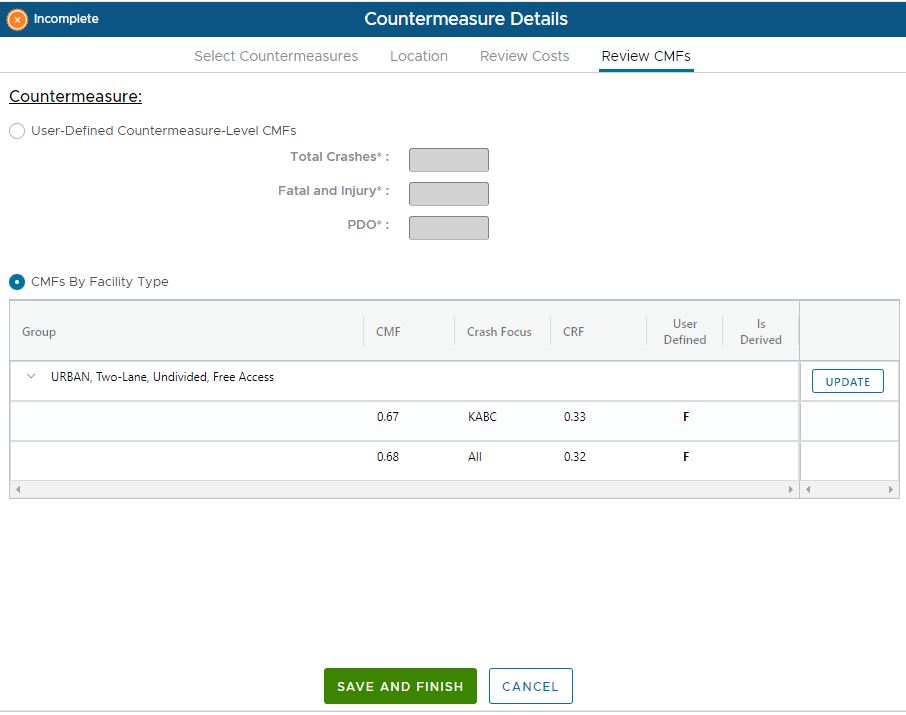
CMFs represent the expected change in crash frequency from implementing one or more countermeasures. CMFs can represent total crashes or specific crash types and severities. It is often more reliable to estimate the expected change in crashes by severity when possible. As such, CLEAR Safety provides separate CMFs for injury-related crashes (KABC on the KABCO injury scale) and property damage only crashes (O on the KABCO scale).
Similar to costs, CMFs will be automatically provided by facility type if available in the system. However, if a CMF doesn't exist in the system for the given facility type, or the user wishes to override the CMF, the can click the "User-Defined Countermeasure CMF" radio button and enter custom values. For guidance on entering a user defined CMF, please refer to the Yellow Book.
When done specifying the CMFs to be applied to this countermeasure, click the SAVE AND FINISH button.
Countermeasure Grid
Once a countermeasure is successfully added to the investigation, it will be listed in the main Countermeasure Selection grid as shown below.
.png)
Each countermeasure added will be displayed as a row in the grid which indicates the name of the Countermeasure, Site description, Facility type, and Benefit/Cost Analysis (BCA) statistics for both total crashes and Fatal/Injury crashes (FI). Tools are available within each row of the grid as follows (from left to right):
•Show Work - This displays a popup dialog showing the crash cost variables and exactly how the BCA statistics were calculated for this countermeasure.
•View - Toggles the visibility for the countermeasure locations on the map display
•Zoom - Zooms the map display to the location(s) of the countermeasure
•Edit - Opens the Countermeasure details dialog for the countermeasure allowing adjustments to any of the tabs described above.
•Delete - Deletes the countermeasure from the investigation
Additional countermeasures can be added to the investigation by clicking the ADD COUNTERMEASURE button above the grid. Also, the countermeasure grid can be exported to a CSV or Excel file by clicking the EXPORT button above the grid.
When done entering countermeasures, click the NEXT > button to proceed to the Alternative Analysis step.
|