|
Reviewing Crashes
The next step during the investigation process is to review and confirm the crash data within the study period and study area. It should be noted that while this is an OPTIONAL step and is not required to complete an investigation, it is an important step because it forms the basis for all subsequent steps of the safety investigation process and supports the post-implementation evaluation process.
Reviewing the underlying crash data helps to confirm the data are reasonably reliable and ensure the subsequent analysis is based on accurate information. In verifying the crash data, it is important to review the police report and crash narrative to confirm attributes and identify crash contributing factors. Analysts can use CLEAR Safety to confirm each crash by reviewing and accepting its attributes and location or editing (or requesting edits) the crash attributes and/or location before confirming.
Crash Review Process
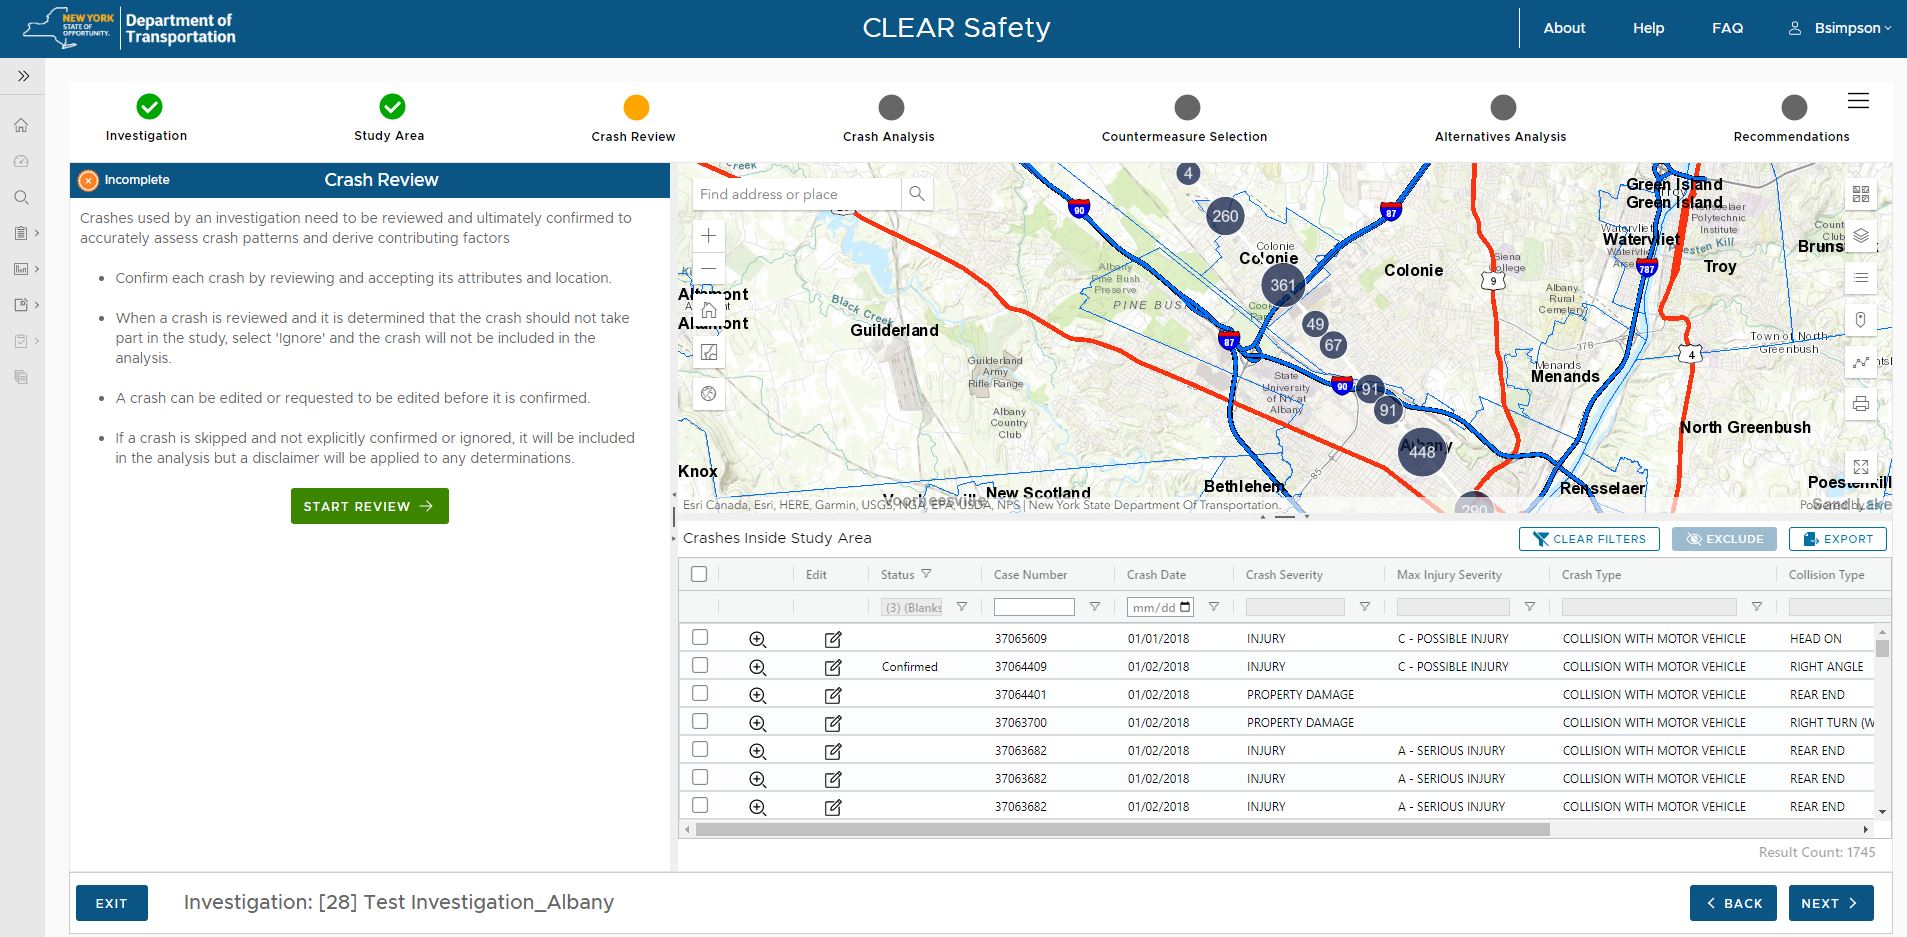
When first entering the Crash Review step, the system overlays the areas of interest boundaries with the crash locations and retrieves all the crashes within the study area for the study period identified in Step 1. The crashes inside the study area are then displayed in a grid at the bottom of the page with the map display zoomed to the extent of all crashes as shown in the image below. Each crash in the study area grid is presented as a row, with the attributes of the crash in each column (case number, crash date, severity, crash type, etc.), as well as status. The status of a crash can be one of the following values:
•Blank - Indicates that this crash is unconfirmed
•Confirmed - Indicates that someone has previously reviewed and confirmed the location and data for this crash. The confirmation could have been done during the current investigation or any other investigation. Once a crash is confirmed, it will show as such in all subsequent investigations.
•Excluded - This indicates that this crash, although falling within the study area/period will be EXCLUDED from the investigation.
•Skipped - This indicates that the review of this crash has been skipped.

There are 2 methods for starting the crash review reviewing crashes: automatic or manual.
Automatic Crash Review
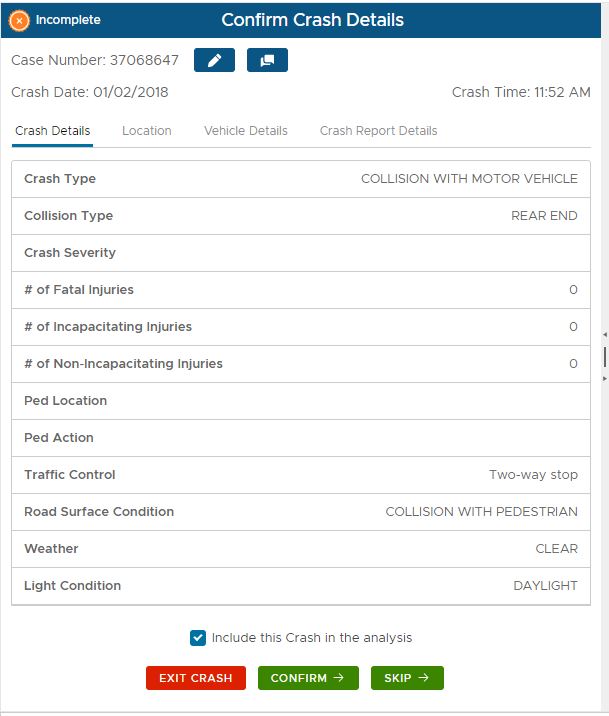
To start the automatic review of crashes click the green START REVIEW button on the left panel. The grid highlights the first crash with a blank status, and displays the details of the crash in the left panel as shown in the image below.

The header at the top of the panel displays the Case Number, Crash date and time. There are four tabs within the Crash Details panel: Crash Details, Location, Vehicle Details and Crash Report Details. Each tab contains different data for the crash. A series of controls at the bottom of the panel provide the user with tools for the following functions:
•Excluding a Crash - By default, all crashes within the study area are included in the study. To exclude the crash from the investigation, UNCHECK the box for "Include this crash in the analysis"
•Confirming the Crash - After reviewing the location of the crash, as well as the details of the crash, if all data appears accurate the user should confirm the crash. To confirm the crash, click the CONFIRM button. This will flag the crash with a status of "Confirmed" and move to the next unconfirmed crash (status = blank).a
•Skipping the Crash - Click the SKIP button to skip the confirmation process for the crash. This indicates that you looked at the crash but cannot fully confirm the crash. By skipping the crash it populates the status of the crash as "Skipped" so that the automatic crash review process doesn't see a "blank" crash and assume it needs to visit the crash again during a subsequent review.
•Exit Crash - This button will exit the automatic crash review process and close the panel for the crash details.
Editing the Crash
During the crash review process, if the user determines that the location or attributes for a crash needs to be modified, the user can either open the ICE application and make the edit at that time, or can request an edit to the crash will be processed by an administrator. There are two buttons at the top of the Crash Details panel that provide these functions as described below.
•Open Case in ICE - Clicking the pencil icon at the top of the panel will launch the Interactive Crash Editor (ICE) application (in a separate browser tab) with the subject crash open for editing. The user can then edit or relocate the crash, then return to the Safety application to confirm the crash.
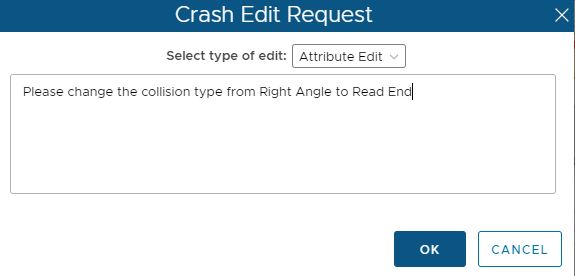
•Request Edit - Clicking the callout icon at the top of the panel will launch the Request edit dialog as shown below. The user then selects the type of edit from the picklist (attribute edit or a relocation) and enters a detailed description of the edit requested, then clicks the OK button. The request is then entered into a queue which will be subsequently processed by an administrator. The user may then wish to mark the crash as "Skipped" temporarily (until the edit is made), then return and confirm the crash once the edit is made by the administrator.

Starting the Crash Review Manually
In addition to automatically starting the crash review with the first unconfirmed crash, the user can choose to start the review process with a specific crash. To review a specific crash, click the EDIT button within the grid row. This will display the Crash Details panel for the crash. The user can then review and process the crash as desired using the tools described above, and either click the EXIT CRASH button to exit the review process, or click the CONFIRM or SKIP buttons which will update the crash status and continue the review process with the next unconfirmed crash.
Excluding a Crash from the Investigation
By default, all crashes within the study area are included in the study. There are two methods to exclude a crash from the investigation such that it does not participate in any analysis.
1. During a crash review, uncheck the box for "Include this crash in the analysis" in the crash details panel as described above
2. Select the crash in the grid by checking the box in the far left column, then click the EXCLUDE button above the grid.
Clearing Filters
If filters are set within the grid (e.g. filtering based on status), clicking the CLEAR FILTERS button at the top of the grid allows the user to clear all filters.
Exporting the Crash Grid
The crash data in the grid can be exported for use outside of CLEAR Safety. To export the grid, click the EXPORT button above the grid. The Export dialog is displayed as shown below. Click the radio button for the format (all fields or case number only) and click the EXPORT button. This will export the crash grid to a CSV file in the format chosen.
.png)
In both cases, the status of the crash will be updated to "Excluded" and the crash will be excluded from the investigation. . tUNCHECK the box for "Include this crash in the analysis"
**When the user is done reviewing crashes, click the NEXT > button in the lower right corner to advance to the next step.
|